Paragliding Equipment and Maintenance
Lines slip at the maillons
Below example of some poor workmanship .
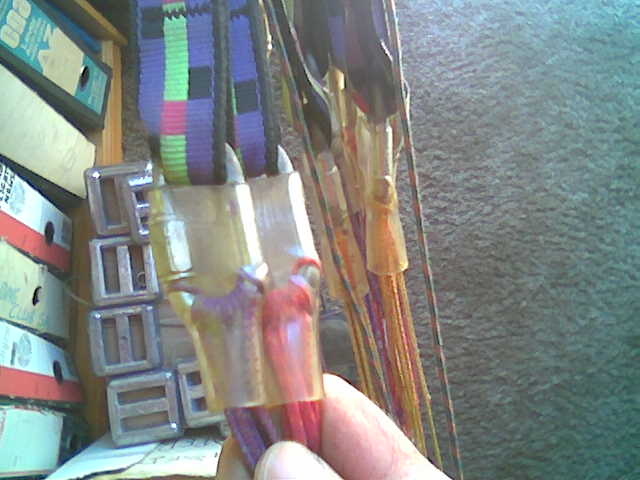
With the lines slipped under the plastic tubing, the line length is out of spec.
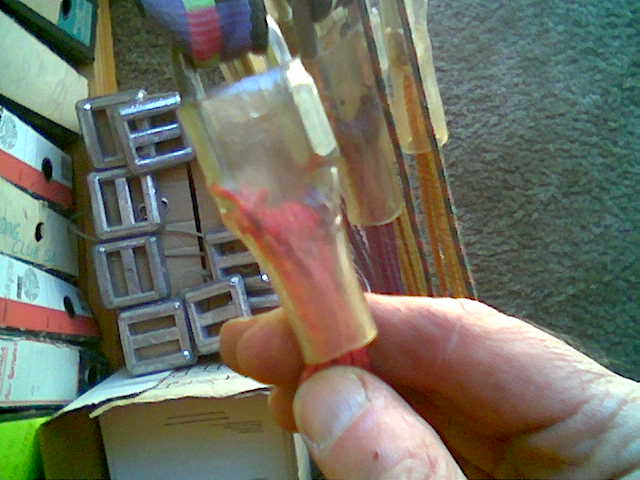
This glider will have some erratic take-off and flying characteristics.
Similar things can happen when the plastic is missing completely. Or if the rubber O ring is missing.
Lines by Laura Nelson
Comp Lines
Every few years someone
gets a wake up call when the comp lines (unsheathed
kevlar lines) on a glider breaks. Then everybody takes note and
replaces
those lines. But with time, the memory
of someone else's close shave fades,
the lines are expensive, and it is
just not convenient to replace them.
There have been a number
of comp line failures in the past. The list will
grow in future, Marinus
Brenkman is just the most recent one at this point.
Some on the list (writing
from memory) are Phil Bristow, Abe Meyer, Anton
Naude.
The line usage in all of
those incidents have been pushed to around 200
hours or more.
In the very beginning the
manufacturers used to tell the pilots to replace
the comp lines every 100 hours. This
is probably a bit on the conservative
side, and considering the expense,
pilots started pushing the limits. The
limit has been proven to be just short
of 200 hours or slightly over. So the
safety margin should be on 150 hours
(flying time). Lines in use with more
hours than that should be regarded as a
safety hazard.
One can determine the
strength of the lines by either regularly checking all
lines to at least half of the rated breaking
strain every 6 or 12 months.
Alternatively one can
test the lines by putting full breaking strain on one
line of each set and noting at what
weight it breaks (if it does break).
Anything breaking at less
than half breaking strain should require
replacement of all lines, or at least all
lines in that set.
A keen eye should be kept
on the condition of the lines at all times. Any
damaged line should be replaced
immediately. Damaged lines are weakened, and
could give way under extreme
circumstances. Any lines missing (there are
many pilots who fly with a broken
line) will put more strain on the
remaining lines under extreme situations.
Extreme manoeuvres may be
entered inadvertently - after a collapse, for
example.
Normal lines
----------------
The lines used on most
gliders are usually thicker and sheathed. Therefore t
hey pick up less UV and mechanical
damage, and will remain stronger for
longer than comp lines. Dyneema is quite a lot stronger and longer lasting
than Kevlar, but both should regularly
be checked for damage, especially
core damage, and weakness. Lines can
be weakened through contact with
electricity, so anybody who has landed in
power cables must do a line
strength test before flying the glider
again. Damage may be hidden inside
the sheath, making it impossible to
see with only visual checking.
These lines should be
strength checked in the same manner as described for
comp lines.
Barberton
----- Original Message
-----
From: "KDK"
Sent:
Subject: Re: [GautengPG] Eyewitness account
the 'show off' 'no pro' 'unstable
falling' 'stunt man'
has drained every last cent from your
medivac account and is spending it as we speak!
no you surely aint
seen that before!
he's well & at home & walking
again.
KDK
~~~~~~~~~~~~~~~~~~~~~~~~~~~~~~~~~~~
On
> So how is marinus ?
>
> -----Original
Message-----
> From: Laura Nelson
> Sent:
> To: KZN Paragliding
& HG Forum; Cape Flight Group; Gauteng Paraglider
> Forum
> Cc: Instructors'
Forum
> Subject: [GautengPG] Eyewitness account
>
>
> (From Ulf)
>
> Saturday 8 May 2004 , around 15.30
> Barberton Golfcourse, driving range, just landed and packing up my glider.
>
> Heard the sound of a
glider collapse
> Looked up and saw a
PG canopy floating in the sky , around 200 m >
above.
> With the pilot
freefalling underneath it.
>
> My first impression
... One of those pilots doing a stunt.
> Some fellow cut away
and will now show off how quickly his xyz reserve
deploys. Seen that before.
>
> But why is he
freefalling so long? Normally those guys throw their
reserve immediately.
>
> He is not really
doing a stable free fall either. Not really a pro.
>
> 100 m above the
ground the reserve deploys and he disappears behind the
clubhouse towards the Sisal area. That pilot did not really plan his stunt very
well.
> Normally you do it
over the center of the golf course.
>
> Some local
spectators come rushing towards me. Wanting to know what went wrong. I tell
them that this was a stunt. Some of the PG pilots do that for fun.
>
> Sirens, emergency
doctor arrives, ambulance follows.
> Wonder how this will
impact on the Casevac insurance.
> Having a all those emergency folks called out for some fellow
showing off.
>
> 2 fellow pilots
recovered the canopy.
> And now it gets laid
out on the parking area.
>
> Maybe I also have a
look why they are all interested in it.
>
> An XIX Sense C with
comp lines.
> The ears are burst
on the outer seams. The stabilo lines are ripped out.
> On one side all the
brake lines broke off at the trailing edge.
> All the other lines
broke off at the risers. At the usual weak spot where they get bent at launch.
>
> The Pilot suffered a
fractured vertebrae coming down on his reserve.
>
> Pilot was spiraling when his glider had enough and decided to
separate from him.
>
> No stunt.
Line replacement
from Dara Hogan off europg
#1 Get a long tape measure (at least 6m) - mine wasn't long enough and, in
fact, it came out of the housing and fell apart while I was using it.
#2 Get a friend to assist - I couldn't have managed
without Mary.
#3 Bring your line-plan and check-measure each old
line before you take it
off the glider. Write down your measurements so that you can determine
the
shrinkage factor (if any).
#4 Check each new line against the old line (before disconnection) to make absolutely sure that your supplier has not mis-measured when cutting the new lines.
#5 Work from the "A"s back to the "C"s (or "D"s) and
lift each complete
layer of lines off the floor and place them separately beyond the leading
edge to ensure that you don't inadvertently connect a new line that might
be
twisted through others.
#6 Ground-handle the wing after you have replaced the
lines and carefully
check that everything seems to be in place before you fly.
Am I the only conscientious pilot changing his lines? I know that Jerry
Parles has re-lined his Apco
Futura recently and he reports a noticeable
improvement. Has anyone else done the decent thing? It's very
important -
all my lines had shrunk but only by 10mm-20mm per line which is, I believe,
within permitted parameters.
DHV Info 152 – Canopy maintenance
Avoid unnecessary sun exposure
The UV kills the polymer chains.
Colour fading is no indication of weakened fabric.
Do not stress load a wet canopy. Polyamide stretches easier when wet.
Doing a spiral with a wet canopy can result in permanent deformation of the wing.
Long-term water and heat exposure can damage your wing.
Pack your canopy dry and store it in a cool and dry place.
If you have to pack up on some wet moist ground, do a loose pack and keep the stuff bag / back pack open.
Give the humidity a chance to evaporate.
High temperatures are no good for your canopy cloth.
High temperature, plus wet canopy, speed up the ageing of your fabric dramatic.
Do not pack a moist canopy into a hot car boot.
Avoid walking over your canopy.
Do not drag it over the ground.
Especially do not drag it over rock or sand.
Get rid of any sand which has built up inside the canopy.
The sand otherwise acts like an abrasive inside your cells.
UV rays exposure .
Leaving your glider in the sun will impact on the strength of your cloth.
Have a look on a windsock or a streamer which has been exposed of a while what the sun and weather does to it.
To keep your glider in good nick, do not leave it open, exposed in the sun.
Bunch it up, or put it under a cover or back into the bag.
Regular cleaning - get the dust and Sand out
To wash or not to wash .....?
----- Original Message -----
From: "Keith Pickersgill"
<flying@xplorer.co.za>
To: "Jeff Ayliffe"
<ayliffe@kfm.co.za>; <capeflight@smartgroups.com>
Sent:
Subject: [capeflight] washing paraglider
wings
Jeff Ayliffe wrote an excellent post about cleaning of wings.
Some time ago I wrote an article about washing wings too, which can be read
at:
http://www.xplorer.co.za/articles
I post an extract below for those interested...
________________________________________
I firmly believe that all paraglider wings should get
a thorough wash down
every 6 months or so if used regularly. You can go much longer without,
especially if you do not notice the dirt, but the wing will suffer the
consequences.
Among my personal collection of wings I have one that I am very fond of. It
is 7 years old and has over 2000 flights on it, yet I still fly it
occasionally, and
everyone comments that it still looks new... actually I believe its
condition is
aking to most wings that are around 2 to 3 years old.
How can such a heavily used wing still look and fly so good?
Because I
wash it regularly.
Why?
A textile engineer whom worked for Gelvenor Textiles
(manufacturer of
good quality paraglider fabric) once told me while
waiting at a paragliding
competition, that the biggest enemy of our wings is NOT ultra-violet, but
dust, grit and general dirt in the fabric. When we walk with the wings, or
while transported in vehicles, the movement and/or vibration causes abrasion
of the protective layers and of the fabric itself. The abrasion is
destructive
when dust or dirt is present in or on the fabric.
Aging of the wing is a result of this abrasion and ensuing erosion of the
protective layers, which reduces your UV resistance and dirt repellent
capabilities, leading to accelerating aging.
Furthermore, the combination of sunlight (UV) onto salty surfaces is far
more devastating than onto clean surfaces. Near the coast, our gliders
collect much salt, which is both an abrasive agent AND accelerates UV
aging of the fabric. Regular removal of the impregnated salt will extend the
life of your wing remarkable.
So I wash all my wings every 6 months or so, and discovered many other
benefits too. The wings retain their dirt repellant
capabilities, they do
not
become so porous, and they last much longer, but the big plus, they retain
their "new" looks and that "fresh" fabric feel and crinkly
sound.
Here is how I do it... Stains and marks, I remove with either Woolite (a
liquid detergent designed for delicate fabrics), or a fabric-softener (as
used
in washing machines' rinse cycle). Certain stains are removed best with one,
other stains respond to the other. Most stains are insect blood and guts
(grasshoppers etc), plant or grass sap, oil and rubber residue picked up
from tarred car parks, etc.
Both Woolite and fabric softeners are friendly to the
fabric, and both
restore
and replenish the protective layers, both the UV shielding and the dirt
repellant layer.
After removing the stains, I then proceed to hang the wing in the shade,
along its trailing edge, using a whole bunch of clothing pegs on a tautly
drawn line.
Then with a fine mist sprayer on a garden hose, thoroughly rinse down just
ONE surface, say the bottom surface first. Pour lots of water on, get it
real
wet and soaking. You will not believe the dirty colour of the water rinsing
away...
Don't worry about the lines, they could also do with a rinse (provided you
re-stretch them afterwards). And the dirtiest part near the risers where you
ground-handle, soak those in Woolite too. Thoroughly
rinse the lines and
risers.
Let that surface dry IN THE SHADE!!!!!
Then do the other surface, in this case the top skin. Again, go overboard
and get it really wet and soaked, keep pouring water on for at least 10
minutes.
Again, let it dry, then do the inside of the wing, by
going inside each cell
and
spraying deep into the wing. The water will simply run out the leading-edge
openings.
Let that dry, which will go quicker if you have the bottom surface facing a
light wind, which will inflate the wing and separate the top and bottom
surfaces. Also, the air will circulate inside the wing carrying the moisture
out.
Wait for the lines to dry thoroughly, then do a
re-stretch of the lines.
Details
below.
The reason you do only one surface at a time, is so as not to overload the
wing with too much water weight, which may distort the fabric as it dries
and
may cause your washing line to sag under the weight. So we do one surface
at a time.
The reason we do this in the shade, is that sunlight will cause certain
areas to
dry much faster than others, and will leave you with a distorted wing. The
only way to recover from that is to again soak the whole wing and re-dry
slowly in the shade again.
I use my double-garage to do this in, but I know others whom work under
oak trees or similar with good shading qualities.
Removing the salt, dust, sand and grit every few months will do the wing a
lot of good and make it last much longer, however the lines will need
further
attention.
Stretching the lines.
Tie a pulley (an old speedbar pulley works well) to a
doorknob or similar
convenient attachment location. Tie a rope of about 2 meters to BOTH your
risers, pass the loose end through the pulley, then
down to a 20 kilogram
weight. I use a water can filled with enough water to give just the right
weight.
Now stretch your wing out with the lines taught.
Take each line one by one at the wing attachment points, and pull gently to
slowly lift the weight off the floor. Hold that for about 20 seconds, then
lower the weight to the floor. Move onto the next line. Concentrate
especially on the rear lines, as these carry less weight in flight therefore
gradually end up shorter than the front lines.
Voila! your wing will fly like new again, and will
look great to boot.
Incidentally, you should do this line stretch every 6 months anyway, so you
may as well combine it with the wing wash.
You should also line stretch every time the lines get wet or damp,
especially
if any Dynema lines are used.
The Dynema lines swell in girth (diameter) when wet,
which makes them
shrink in length. When next you fly, the front lines quickly stretch back to
their original length, but the rear lines seldom do, leading to the wing
becoming sluggish and more prone to parachutal
incidents.
Now, a trick I learnt recently after getting my lovely all white paramotor
wing all black form burnt flora. I thought the wing
was wrecked! I soaked
the wing, lines, risers and all, in a tub filled with luke-warm
water (about
25
degrees), and one bottle of Woolite mixed into the
water. Soaked overnight,
then found the marks simply wiped off with no effort
at all. Also, other old
marks, oil, insect blood, grass stains, etc, were almost completely gone,
and
the rest came off with a light rub with my bare hands.
After a thorough rinse, I laid the wing on the grass to dry a bit (in the
shade!), then turned it over for a while to dry the other side, by then it
was
light enough to hang on the line, leading edge down, for final drying. A
quick
line stretch later, I had a wing that looked like brand new!!! It still
does, 50
flights later.
I have never noticed any change in behaviour of the fabric, stitching,
colours,
or the flying, from any wing after washing. I have spoken to many fabric
manufacturers, none see any problem with Woolite or fabric softener (like
Sta-Soft).
Furthermore, I have put in plenty of hours on such wings, including my 7
year old favourite which still looks almost new even after heavy usage.
I now firmly believe in the benefits of regular washing of wings. In the
last
few years I have been flying mostly all white wings, something I was always
scared of as whites seemed to get dirty so fast. Now I enjoy the beauty of
an all-white wing and keep it looking good with regular washes without fear
of damaging the wing.
_____________________________________________________
Keith Pickersgill
Xplorer UltraFlight,
Performance Paramotors
PO Box 36784, Chempet, 7442
Cape Town, South Africa.
Tel: +27(0)21 555-1752
Fax: +27(0)21 555-1753
email: info@xplorer.co.za
http://www.xplorer.co.za
World's best paramotors
http://www.xplorer.co.za/hangsim
Flight Simulator
http://www.paragliding.co.za/ppg
Powered Paragliding in RSA
_________________________________________________
"Good judgement comes from experience.
Unfortunately, the experience usually
comes from bad judgement." Unknown Pilot.
----------------------------------
When washing your glider, or when it got wet by a waterlanding,
the weight increases.
Take out the glider with lots of support to avoid tears, or stretch.
Make sure the cells can empty the water contents.
Leave glider flat on grass for a while to let the water run off before
hanging it up.
Inflate, pull up after a while to get it dry asap.
Do a line shrinkage check afterwards.
Keep out of the sun
Store dry, a damp glider stored in warm environment will swifly become useless
humidity, rain, water can impact on your glider performance
sand, dust, rocks in your glider work like abrasive, getting swirled around inside the cells
Regular Paraglider airworthiness Test procedure
Check for Line shrinkage
line length , line load , line stretch
porosity test , suck
thumb test
Reserve
repacking
humidity, water, opening time
material ageing
Water bag, Camel bag
Use
Use plain water to reduce the growth of any bacteria.
Travel Tips
When I travel I got myusual
backpack with my glider.
And I use a 2nd backpack for my other luggage. Reason - in case my
main backpack falls apart I got another at hand to use.
Kit to take along - repair tape , some
spare line material , and a car plug charger for the batteries , radios, ...
How to secure your equipment
All of my loose items are tied on by elastic rubber string.
This way the strings are short but the goddie
can be reached, pulled, extended when necessary.
Harness
Gliders get CEN or DHV tested with a predefined chest strap setting. Like 42 cm for an average size. Changing this distance can result in a different behavior of your glider when recovering.
For Acro or when things go wrong sit upright. Otherwise you get twisted lines. For XC, or com flying, one prefers the surpine, flat, drag reducing position. But when you get a collapse your body will not turn as fast as the glider does and you get a twisted. Which can stop your brakes from working and then you are in a real mess
Back protectors get tested by DHV. http://www.dhv.de/typo/Testing.19.0.html
A good protector has a low g rate test result.
Anything above 20g is rated as a failed back protector.
Back protector test video link
http://www.supair.com/fr/index.php?l=../includes/test_sellette_fr.php
http://www.supair.com/includes/test_sellette.php
You need foam close to your spine to distribute the impact load evenly over your body.
At the outside have some kevlar back plate to protect against penetrating objects.
And have an airbag to reduce the g loads on impact.
Looking after your wing
Reference Info
How to repair your glider Repairs
http://www.ffvl.fr/FFVL/Commission_securite/documents/?id=Not_logged&Categorie=Homologation
|
00136135 |
prEN 926-1 rev |
Paragliding equipment - Paragliders - Part 1: Requirements and test methods for structural strength |
No |
Under Approval |
2005-02 |
|
00136143 |
EN 926-2:2005 |
Paragliding equipment - Paragliders - Part 2: Requirements and test methods for classifying flight safety characteristics |
No |
Approved |
2005-03 |
http://www.ojovolador.com/eng/read/reports/cen
CEN Flying tests [EN 926-2, Paragliding equipment Paragliders Part 2: Requirements and test methods for classifying flight safety characteristics ] and compare and contrast the old with the new (you can download the document from this site as pdf).
http://www.ojovolador.com/eng/read/reports/porcher/index.htm